Today I would like to share another of the methods I use.
This post is NOT a post on how to make a rope but rather how I get the combination/colour/look
of a rope for a centrepiece.
Whenever creating a 'rope' I have a general idea of what I want and mostly know
what colours to use - having already created the feature components.
Below is a length of 'rope' which is the way I work out how I want the rope to look.
I will explain each step I used and give reasons why I abandoned the idea.
Reading the images from your left to right -
STEPS TAKEN
1) A FIVE bead around PRAW started and abandoned - No image shown
REASON ABANDONED: Needs an even number for easy embellishing
2) A four bead around CRAW started - I wanted to see
how a row of green 11s, then gold 11s, then green 11s
would look.
REASON ABANDONED: Rope looked too 'busy'.

3) Plain green was used and embellished with green 15s
REASON ABANDONED: It was plain and boring
4) Plain green was used and embellished with gold 15s
SUCCESS: I liked this for the thinner rope sections

5) Went into gold 11s and then 2mm Czech Fire
Polished gold beads embellished in a mauve 11 and 15s.
REASON ABANDONED: Didn't like the mauve 15s, too attention grabbing
6) Used 4mm Czech Fire Polish and embellishing in between with green magatamas.
REASON ABANDONED: Overall colour looking too dull, didn't like the maggies.
7) Made a combination of CRAW with 2mm Czech Fire Polish with green 11s
SUCCESS: I liked this bit

8) Got side tracked seeing what the rope would look like if I tried to increase the width then added in some mauve 11s to bring down the increase. Then repeated this again.
REASON ABANDONED: Not what I was looking for but felt the increase/decrease in size was interesting.
THEN I started another rope of 6 beads around CRAW - (no image shown)
After doing a couple of inches I decided I didn't want that either.
9) Returning to the long rope I did a section of green

11s embellished in gold 15s to give me some space for when I cut off what wasn't working
10) Started weaving in the green 11s and gold Czech 2mm Fire Polish, then embellished in mauve features with gold 15s netting
REASON ABANDONED: Too much gold!! if that is possible! Still didn't like the mauve 15s.
11) Next couple of rows woven using 2mm and 3mm gold Czech FP crystals then another row using a 4mm
purple druk bead.
REASON ABANDONED: Still too much gold, cannot see the FP beads under the netting and the Purple druk was making it too dark.
12) The 4mm druk replaced with a pale green druk. Embellised this in green 15s with gold cross points
REASON ABANDONED: Embellishment was too dark, but I liked the pale green druk.
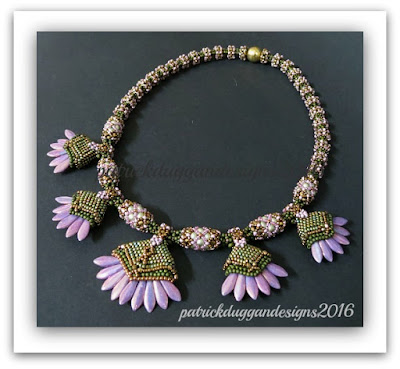
By this stage I had a much better idea of the rope I was after and started beading the combination I wanted - which has been removed from the experimental piece and is seen in the image below.
I am unable to show more of the rope at this point - it is being saved for a reveal in due course.
Here you will see some of the trials from the above experimental rope.
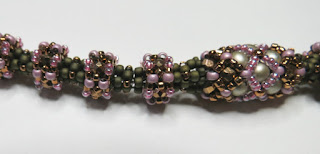
I stayed with a 4 bead around CRAW in green.
I used a gold 15 seed bead embellishment.
I enjoyed the raised bit of the top rope but achieved this look with a 2mm Czech Fire Polish bead embellishment.
I stayed with the 2mm gold Czech FP in the rope as a way to increase the width of rope and ready
the rope for the 4mm pale green druk beads.
The embellishment of the druks remained pale coloured to help lighten up the appearance of the
overall look.
BENEFITS OF WORKING THIS WAY
Saves your Fireline/One G/favourite thread. When you put aside what you don't like and start another you are wasting thread.
Gives you something to hold onto as you continue working on the piece you have in your hand.
Keeps abandoned ideas under your nose. Hopefully you won't repeat them further on.
Keeps ideas you DO like under your nose for repetition when you have your intended rope pattern.
Helps to determine the intricacies and subtleties of your colour palette.
Helps you figure out the best thread path/s
So this is how I decide on a rope for the necklace/centrepiece I am designing. I am sure it is not everyone's way of working - and that is okay - but it is my way.
I am not a person that sits and draws their designs. I generally have an idea in my mind's eye, sometimes an image also, but not always.
I sit down, get out the beads and begin and I keep going until I achieve what I set out to achieve, or
abandon an idea if I see it doesn't work or look good.
Designing is most definitely a trial and error occupation. I am amazed when a new beader makes comments implying they think designing comes easy to designers. Believe me….it doesn't! …..
in most cases.